Powered By Blogger

Monday, 24 November 2014

Commercial Washrooms

This was a slightly unusual job as it is only going to be a temporary site toilet for building contractors within a university student accommodation building project which is just starting. This is why there are no tiles on the walls or floors. There was already a wash basin and toilet in situ so we completed the job by fitting this 1800mm stainless steel trough urinal.
 Note the rodding point on our waste pipe for future ease of maintenance.
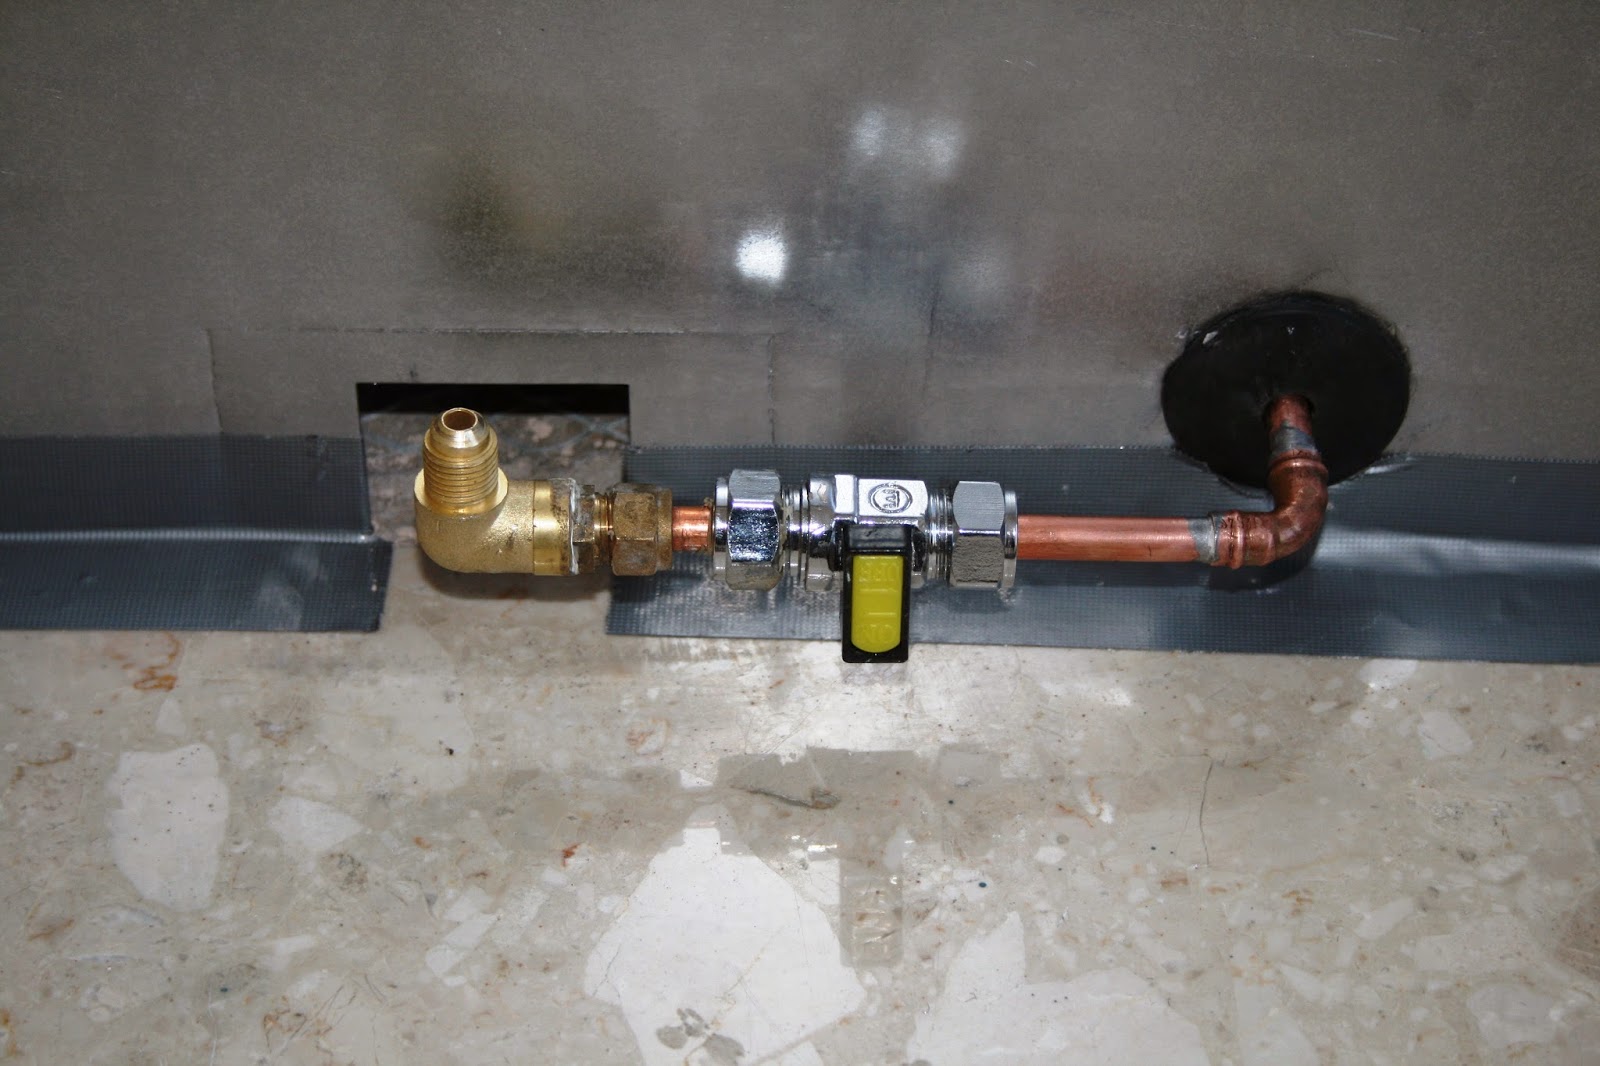
 This is a basic hydraulic flushing valve. It is a water saving device. Every time someone uses the basin tap or flushes the W.C. it senses the change in water pressure and admits some water into the cistern serving the urinal. The regularity of the urinal cistern flushing is therefore governed by the amount of people using the washroom.
 There she goes; the first flush during our commissioning! If you'd like any information on commercial sanitary products or water saving devices please do give us a call.

Thursday, 25 September 2014

Contract Bathrooms

As well as doing 'high end' type bathrooms we also do lots of what are termed 'contract' types. These are usually for housing associations or private landlords. Here's some pictures of one we recently completed.
The old suite and tiles were completely stripped out. The walls were made good to and fully retiled. The floor was also tiled. The electric shower is a Triton T80Z, 8.5KW model. It is fitted over the bath with a bath shower screen to contain the water. Note the correct arrangement of the unit and the sliding rail. The shower should always be on the nearside so it can be switched on from outside of the bath without getting a soaking. The hose and handset should always finish up in the centre of the wall. To do this the sliding rail needs to be slightly off centre.

The bath is a Twyfords 'Neptune' twin grip, anti slip model in pressed steel. Taps are lever style 1/4 turn for ease of use. When the bath is fitted, leveled and secured we fill it with water and seal it to the plaster of the wall. This is the first seal and it will be hidden. After the tiling is complete we do a finishing seal to the tiles, again with the bath filled. We only use top quality silicone sealant by Dow Corning and never your 99p DIY store stuff! All tiles are bedded on waterproof adhesive and sealed with waterproof grout.A bath fitted in this way will never leak at its junctions with the tiles. 


The basin is from the Twyfords 'Option' range. It is fitted after the tiling is complete so there are no unsightly cuts.

The W.C. is again from the Twyfords 'Option' range and is quite compact as it had to fit into this alcove. The drain coming up from the floor was off the wall which in turn would have brought the toilet off the wall. We see many like this where the installer has fitted an unsightly wooden batten behind the cistern to make up the gap which looks awful. As the drain couldn't be altered on this job we studded the wall out and plaster boarded it to bring it to the correct distance. The cistern now sits perfectly on the tiles.

Friday, 22 August 2014

Our Latest Bathroom Refit

We gave this bathroom a full refit for our discerning customer who had wisely selected high quality products. The old suite and tiles were completely stripped out and the plaster work was made good to, in readiness for tiling. The shower is a built in Mira 'Discovery' with a variable rail kit. A Kudos 'Inspire' two panel shower screen keeps it all water tight. The bath is an Ideal ' Marina' 1800mm model which is slightly longer than standard for extra room and comfort. The semi recessed basin is from the Ideal 'Soft Mood' range and sits in a 650mm basin unit which provides storage space. All work was carried out by us except for the electrics to the new light and extractor fan which our approved electrical sub contractor done. If you'd like to know more about the best bathroom products {what to buy / what not to buy and all the other secrets} from someone who's been in the trade for 34 years please do not hesitate to contact me.


 Ideal 'Tempo' close coupled W.C. 
 Stelrad 'Concord' 1186 x 450mm white towel rail


Thursday, 3 April 2014

New Water Main In A Factory.

 This is a new water main we installed in a factory site yesterday. Due to the foundations of the building the main couldn't be routed under the building and in through the floor.
Instead we used a product called 'Groundbreaker' developed for these very situations.

Our first job was to drill a 100mm hole through the wall using a diamond core bit. We first started using these diamond cores about twenty five years ago. You can buy a full set now in a case for what we were paying for a single bit back then. They have come right down in price but there are some poor quality ones out there that don't last. They might be OK for the DIY man but won't stand the rigors of trade use.


Once drilled a wall sleeve is fitted, then a ribbed duct pipe with 90mm insulation. The back plate is then fixed to the wall. A 'hockey stick' type pre formed piece of M.D.P.E. pipe is then fitted through the wall.
The back plate has a two piece insulation panel the covers the pipe. In this photo the top piece hasn't been fitted for illustration purposes.

Due to the entry height in this factory we've had to join together two ducts to give full coverage. The duct should idealy go to the bottom of the trench in which the pipe is layed. This isn't possible here due to the type of foundations so insulation has to be fitted to the pipe between the base of the trench and the start of the duct.

As Water Industry Approved Plumbers we are always happy to advise on matters like this and interested in quoting for any such water main related work.

Friday, 21 March 2014

Fitting a Gas Fire in Rented Accommodation

This series of pictures shows the installation of a Robinson Willey 'Firegem' gas fire. It's a basic, no frills, radiant convector fire. We have fitted thousands of them over the years mainly in private rented accommodation and social housing.       The first picture shows the correctly sealed closure plate and the supply pipe which on this job is concealed. Note the air relief opening in the bottom centre of the plate. We have also serviced thousands of these fires. An essential part of the service is to remove the closure plate and check the builders opening is of correct dimension, fully sealed and clear of debris. One of the commonest faults we find is incorrectly sized openings. Indeed this opening wasn't quite right and required some slight modification work which you can see above the plate.                                                  
Picture 2 shows the supply pipe cut to size and a gas service cock fitted A flue flow test has been carried out and it's all ready for the fire to go on now.   Picture 3 shows the fire fitted securely to the wall. The gas has been tested for tightness and the gauge is now connected to the fire to measure the burner pressure. A spillage test is then carried out to ensure the flue is removing all of the products of combustion. The final picture shows the finished article with the front cover now fitted. We just need the painter to make good to our little bit of patch plastering and that's it. Note that no closure plate tape should be visible above the fire once fitted. If it is it suggests that the builders opening is too high or the plate hasn't been cut correctly to size.                                                                
   This is the hearth standing version. It can be wall hung if the feet are removed. The builders open for a wall hung fire is different to that of a hearth standing one. It is smaller in height and higher off the floor due to there being no hearth. We still often find these fires fitted freestanding on hearths with no fixings to the wall. The only thing holding them is the gas pipe! Even if hearth mounted they must be securely fixed to the wall.                                                               If you are a landlord or letting agent and need any advice about suitable fires for rented accommodation please free to get in touch. Also if you have any concerns about chimneys or correct sizes for builders openers for these or any other fires we are happy to advise.                                                        

Wednesday, 19 March 2014

Commercial Water Heater Maintenance

Here I am swapping a sacrificial anode on an Andrews water heater during some commercial boiler room maintenance. It is for a for a health centre for whom we have just taken over the maintenance.
Sacrificial Anodes are highly active metals that are used to prevent a less active material surface from corroding.  They are created from a metal alloy with a more negative electro-chemical potential than the other metal they are being used to protect.  The sacrificial anode will be consumed in place of the metal it is protecting, which is why it is referred to as a "sacrificial".
If you would like to discuss any maintenance of commercial equipment such as this we are always happy talk and hopefully help you

Saturday, 15 March 2014

Gas Safe Work Inspection

Here's John carrying out a gas tightness test during a recent visit from the 'Gas Safe' inspector. This test is to check that there are no leaks on the installation. Our work gets inspected at regular intervals to ensure we meet the high standards of safety required. The tightness test is always one the favourite tasks the inspector asks us to perform.
The inspector normally asks to see three recent gas jobs. On this visit we took him to the new build site we completed last month where there were nine bungalows to choose from.
I first registered with C.O.R.G.I. the predecessor of 'Gas Safe' way back in 1985. The gas U-gauge or manometer in the pictures is the one I used for my first inspection which those in the trade will recognise as the tough old Abbirko traditional model. It is still going strong now and still in active use all these years on. We do of course carry equipment in our vans to enable this test to be done electronically. This is done with our flue gas analysers and is useful because it enables us to do a print out of the result. If you have any questions or queries about testing gas installations please feel free to contact me.

Thursday, 6 March 2014

Protect Your Boiler

 New boilers cost a lot of money so it is crazy not to protect your investment. This curious looking fitment is the Worcester Greenstar System Filter. It's not the easiest object to get an interesting photo of but it is worth investing in one for two very good reasons ~
{1}It has been specifically designed to combat the damaging effects of
any debris and pollutants within your heating system by trapping them.
{2} When fitted with a new Worcester boiler it earns you an extra year on the warranty.
At its centre is a very powerful integral magnet that catches and retains any metallic debris that is present in the system heating water. Any non-magnetic debris is caught by the twin-action cyclonic trap. They can be cleaned each year during the annual service or sooner if need be.
They are sited on the boiler return pipe and as such ideally suited when boilers are hidden in cupboards so they are concealed but still easily accessible. They cost around £120 which is a small price to pay for something that protects your boiler 24 hours a day, everyday.
Please do contact me if you'd like to know more about this or any other brand of magnetic filter.

Wednesday, 5 March 2014

A Nice Money Saver - The FW100 Weather Compensation Controller

This unit is a weather compensation controller. It is linked up to your boiler and an outdoor sensor. It may sound complicated but for us, they are fairly easy to install. They don't cost a great deal more than a typical wireless programmable room thermostat either. It can fit on the fascia of your Worcester boiler or be wall mounted remotely like a room thermostat {as this one is}. They are about the same size as a typical programmer.  It enables your boiler to anticipate changes in heating demand in relation to external temperatures and regulate accordingly. Or to put it another way; it will save you money! If you have any questions or enquiries about 'Intelligent Controls' as these types of control are called please feel free to e-mail or call me.


Monday, 19 August 2013

New Build Site

We are currently carrying out the plumbing, heating and gas installation in nine new build bungalows.
 Here is Joe one of our engineers installing first fix pipework prior to plasterers coming in. All the plumbing and heating pipes are in plastic due to cost and to deter theft as it has no scrap value. This seems to be the case now in all new build schemes.

This is a pipe drop which will be serving a radiator. It is enclosed in capping and will be covered over by plasterboard. A metallic tape is stuck onto the face of the capping so the presence of the pipes can be detected later with a cable / metal detecting device. There are blanks on the end of the pipes so we can pressure test them.
 10mm branches off the main heating circuit are routed to radiator positions in one continuous run without the need for joints.

Wednesday, 17 July 2013

A Bit of Plumbers History

When I was an apprentice {1980 - 1984} with I.C.I .we did a lot of work with lead pipes. Indeed it was still a large part of the Plumbing City & Guilds syllabus back then. I.C.I. owned an estate of houses adjacent to their factory all of which were plumbed out entirely in lead pipe. Interestingly these streets, two straight roads and a crescent, if viewed from above spelt I.C.I.
We spent a lot of time repairing lead pipes and doing wiped joints just like this one in my picture in those houses. Some of the Plumbers who I was apprenticed to actually lived on 'The Estate' as it was known. The square thing in the picture is one of my old wiping cloths with which we moulded the molten solder into shape. You had to be fairly quick or the lead and tin which made up wiping solder would start to separate making it hard to work with. We are currently re-plumbing a big old six bedroom house on the Wirral and have pulled a lot of old lead pipe out. I saved this bit as it brought back many memories. I was aching all over after lugging all the lead out as well as a cast iron bath. The Plumbers in those days must have been very strong men.

Tuesday, 4 June 2013

Shower Bath

This is a square offset shower as opposed to the more common curved offset versions. We fitted it on a full house re-plumb we've just finished. It has its own unique side panel and screen.
 Here it is from the front elevation.
 The shower we fitted is a Mira 'Adept' built in thermostatic mixer with a large pan style fixed head.


Saturday, 18 May 2013

The Bad, The Ugly and The Good!

THE BAD. Thankfully this boiler and its shocking pipework were stripped out by us yesterday. Sadly I've actually seen worse than this but just haven't had my camera with me. The boiler itself is a bottom end, low cost type model. Such poor quality cheap boilers actually have greater lifetime costs over their short lives than the better quality boilers. They are unreliable and the spare parts for them are vastly over priced. The installers who fit such boilers are invariably from the lower end of our trade and this type of pipework is their hallmark.

THE UGLY. Note the poorly soldered joints and the green corrosive flux residues. The joker who did this work has used self cleaning flux and not bothered to wipe down his joints.

THE GOOD. I love the old quote about how you should never argue with an idiot in the street, as anyone walking past wouldn't be able to tell the difference! Likewise a good tradesman should never try to join on to such poor pipework. It is impossible to make it look neat and you are simply pulling yourself down to the original installers level. We stripped this mess all out and started again. The new boiler is the Worcester 28CDi 'Compact' complete with seven year warranty. The pipes are much neater now thanks to the spirit level on the left of the picture. We only use Fry's traditional 'Fluxite' on our soldered joints. You have to clean your pipes and fittings with wire wool but it is is much cleaner and gives better results. Luckily the customer has some spare matching tiles which we will slot in later leaving the job in much better shape than when we found it.

Here's a little shot of inside the aptly named 'Compact' boiler. I predict we'll be fitting quite a lot of these.

Friday, 10 May 2013

The Worcester 36CDi Compact

Here's one of Worcester's 'Compact' range of high efficiency combination boilers, with the cover off. It comes with a full seven year warranty. We fitted this one yesterday in readiness for our customer getting his new kitchen installed. He wants the boiler to be completely hidden and this model solved his problem.
We have moved it slightly and tidied up the pipes so it will all now fit within a 600mm wide wall unit. The filter on the left of the boiler is a Sentinel 'Eliminator' which will pick up any magnetic and non magnetic system debris and contaminants providing life long protection. This will also be accommodated within the same wall unit as the boiler.
If you would like to discuss hiding boilers from view and how best to to do it them please do contact us.

Thursday, 11 April 2013

A Simply Solution To Frozen Boiler Condensate Drains

Have you had trouble with frozen condensate pipes over the last couple of winters? All the best solutions to problems tend to be simply. Here is a device from Worcester for you, which will prevent this happening. It clicks onto the flow pipe beneath the boiler. The condensate from the boiler fills into it and is warmed up by heat transfer from the flow pipe. When a certain level is reached the now warm condensate is discharged by a syphonic action. Due to it being warm coupled with the velocity of discharge it doesn't freeze. There are no electrics or running costs to it. It can be retro fitted in most cases for under £70 all in. The one in the picture was given to us by a supplier to field trial. We were upgrading a customers boiler to a top of the range Worcester CDi, so we threw this in free of charge as she had been troubled by frozen condensate pipework. There's a link here to a short video from Worcester which explains it much better than me. If you need any more information about this product or have been troubled by frozen condensate pipes please do give me a call. It's far better to get these matters in hand over the spring and summer.


Monday, 24 December 2012

The Ultimate Gas Saver

Do you want to reduce your gas bill? It's a silly question; of course you do. We normally do this for our customers by ensuring they have the latest energy saving heating controls and high efficiency boilers. However there are other ways.
If you have the right type of chimney and a ready supply of logs then a high efficiency wood burning stove may well suit you.
This one that we have fitted is the Hamlet 'Solution' inset 7KW model. It comes with a ten year warranty. We also fitted the fire surround which is the 'Palmerston' cast iron with polished back and slabbed hearth and took care of all of the associated building work too. These stoves are becoming more popular and rightly so. There is something rather pleasing about sitting in front of a log fire especially when the price of gas continues to rise.


Friday, 21 December 2012

Designer Radiators

Are you looking for something a bit different from the standard panel radiator? We can supply and fit all manner of different radiators to match your home or taste. Here's an example of one we fitted last week. It's a reproduction period style cast iron radiator. They are available in various different finishes, styles and sizes; this one is in metallic pewter. They come with a ten year warranty
 

The valve which is traditionally styled is actually thermostatic.
If you have any questions or queries about radiators of any type or style we are always happy to help.

Tuesday, 27 November 2012

Change of use job

Here are a few pictures from what the planning department call a 'Change of use' job. A former bedroom has been converted into an en suite bathroom. It compries of a 760mm shower cubicle, a wash basin on a pedestal, a toilet and a towel rail radiator. We are just doing the finishing touches today.
We had to excavate the driveway and form a branch into the the main drain for a soil vent pipe to serve the new bathroom. We also replaced a broken rainwater gulley and resited it against the wall. I took this picture whilst waiting for the building inspector to pass the drains so we could stone it up and back fill.
 

All walls inside were tiled and the existing radiator was replaced with a chrome ladder style towel rail with concealed pipes.


The shower valve is a built in Mira with a variable riser kit. All pipework is concealed in the cupboard we constructed that backs onto the shower.

I had to stand on a step ladder to get this shot. The tray is also by Mira as is the fold down seat and the cubicle. The floor you will note has been over layed with plywood in readiness for a non slip vinyl covering which is getting fitted once we are completed.

The 450mm wide basin is rather compact and has been selected due to space being of a premium. The tap is by Bristan.
 
We carried out all the external drainage work, the plastering, joinery, resiting a boiler, electrics and tiling as well as the plumbing. Our customer had just one company to deal with; us. If you'd like another bathroom and aren't sure if it's possible or think it may cost too much or don't fancy dealing with lots of different trades or building inspectors please give us a call. We can take care of everything and it may not cost as much as you think.